Learning to build the right thing; how you can apply user research to make your product successful
Some time ago, the owners of a $25 billion retail company hired the well known UX consultant Jared Spool to review their website, recommend changes and increase sales. He looked at the website traffic, and found that after selecting what they wanted to buy, customers would abandon their shopping carts, right before the point where they would enter their payment details and push the “Buy” button. This occurred so often, the company worked out it caused an estimated loss of $300 million per year in revenue, and the company had no idea why. Mr Spool then brought in users to try the site, giving them lists of things to buy, and money to buy it with, all they had to do was complete the process and hit the button. It turned out that they couldn’t complete this simple objective.
Speaking to the users after the sessions, it turned out that the point that they stopped the process was when they came to a simple login/register form, just before the payment details page. It turned out that users were not interested in filling this out, not knowing if they had logged in before, not being bothered to find their password, not wanting to sign up for fear of being sent marketing messages, or feeling that giving away details infringed their privacy, so they simply abandoned the process. The consultant took away the form, replacing it with a button saying “continue”, instead offering repeat customers the ability to make an account after they had completed their purchase. The number of sales went up by 45%, the extra purchases profiting the company an extra $15 million in the first month, and regained the missing $300 million per year.
We can see from this example that proper UX research can be fundamental to the true success of a project. Instead of launching the website, having it run for a while, and then only discovering this massive loss in revenue later on, the company could have prevented it by conducting research with their customers, and discovering that they don’t wish to log in or register mid-way through the checkout process. However, in order to catch these details, you need to be able to ensure that your research is well carried out. This guide is a comprehensive review of the complete research process, filled with tips from years of my own experience. It is designed to help you improve your sessions with users, and gain insights that not only fulfil customer requirements, but also to work with the findings to exceed those requirements, and make something which is truly valuable to the user, which in turn ensures the success of the product when it is launched.
Note: this guide is somewhat expansive, but I’ve provided a handy PDF checklist at the bottom, to review the points, and act as a reminder for your next project.
Before you begin — plan out your research
By writing a research plan at the start, you define your intentions for yourself, and ensure that you’ve considered the entire problem before starting. Importantly, the plan you create also becomes a tool to communicate your intentions to stakeholders and team members; bringing them along on the journey, making it clear what you intend to do, giving them the ability to ask questions, and contribute their own ideas. After all, you are conducting the research not just for yourself, but to inform their work in planning and production, so it is important to ensure that they have a voice in how the discoveries are made.
What questions will you ask?
The user interview is at the centre of any research effort; it is your chance to learn from the users themselves, and therefore you want to ensure you optimise your limited time with them, by asking the right questions, filling in the gaps in knowledge, and reinforcing any assumptions. Therefore, start by assessing what you currently know, and defining what you don’t.
At the start of a project, you will have had an introduction to the project. Stakeholders will have defined the brief, and presented you with surrounding information, to help build out your understanding of the context. Using what you have learned in this session, you can map out the assumed key journey the user needs to complete in order to be successful, and interrogate it.
Start by writing out each step in the journey on notes in a horizontal line. Once you have that, you can then add notes below to define questions, ideas and comments that arise around each of those steps.

When adding notes below each step, try to think out, as extensively as possible, what you do and don’t know about each step, and write it all down, the more in-depth you can get, the better. Make a note of points which are clearly known, and what are assumptions that need to be proven. Record the questions you have around the step, so you can define what you don’t currently know, as well as any ideas on how you think the process might work, and extra comments that don’t fit in the first two categories. Encourage your team to take part — present your thoughts to them, and ask for feedback, or grab someone for a coffee and take them through your thoughts on the board. Getting feedback and suggestions from others will aid you in exploring the problem more comprehensively.
Once the journey has been extensively explored, you will be able to write down all of the questions you will need to ask. They won’t just be the ones on the question notes, you will probably want to enquire about some of the ideas and comments with users, too, in order to get their opinion on your thoughts. This list of questions will evolve over time, as you get a better understanding of the problem, and it is useful to share this on a team workspace, so that others can see and contribute to them.
Whom will you speak to?
Hopefully, your stakeholders will have given you details of users to contact and arrange the interview sessions with (I have worked in situations where this is not the case, and the efforts that I made in order to find users to interview would take up an entirely separate guide), and you will now need to define your interview schedule, which asks the question — how many people will you need to talk to?
What you’re aiming for is interviewing until you don’t learn anything from new interviews. The aim here is to ask your questions to different people, until you reach the point where the answers repeat the same concepts you’ve heard from other interviews, and you’re not learning anything new (referred to as “saturation”). For a relatively simple project, you’ll begin to notice this happening after five interviews. For projects with more complex subject matter, or a large number of types of user, you might need more interviews before this becomes apparent (and even have to build in time for you to get to grips with simple context at the start, before beginning to make discoveries).

For more complex projects, you may have to deal with different user types. They could be different, due to having a different role in using the product, or from a different geographical location, each giving them different requirements. Here, you are looking to identify similarities and differences in their answers within their user type, as well as with those outside the user group. This will help you later on to build personas for each user type, understanding the similar and different requirements for each.
How are you going to conduct the sessions?
Once you know the questions you are going to ask, and the people who you are going to talk to, you need to decide how you will communicate: in person, or remotely, in their workplace, or in yours? Depending upon your situation, you might have restrictions that define that for you (such as budget, distance, or pandemics), but if you have the choice, then there are some things to consider before you choose how and where to talk.

In person interviews: It is best if you can meet with people in person, as you are not only able to see a range of both vocal and bodily actions in their responses, but your being present in the room will also help make the user feel more comfortable, and will help them open up to you, if they are unsure about the process or questions. Ideally, you will want to speak with them at their place of work, or the surroundings where they use the product you are making, as that will also help to provide further supporting information, and may even offer visual stimulus, such as examples of current solutions and tools, which will help them to explain things to you more clearly. However, if their workplace is prohibitive, because you are not allowed in it, or it is too noisy to hold an interview in, then you may wish to consider taking them to somewhere that you have more control over, such as a meeting room.

Video interviews: If your subject is too far away, or there are restrictions preventing you from meeting up, video interviews are the next best thing to meeting in person. They provide a way of seeing the other person’s face, which is useful for recording non-verbal responses, as well as allowing them to see you, which can set them at ease, but you lose the ability to control the environment in which they are being interviewed, which leaves the interview open to disruptions, such as them being distracted by phone calls, and things happening on their end.
Audio interviews: These are something of a last resort. Audio interviews over the phone, or on a video call with the camera off, are better than no interview at all, but should only be carried out if you have no other way to speak with them. You lose a lot by not being able to see the person you are talking to, but in some cases, you may not be able to see them due to techological or security restrictions. If this is the case, try to ensure that your audio recording is as clear as possible, so you can pick up as many cues from that as possible (and, again, that they know and are happy with being recorded).
Keep it one-to-one: You’re looking to conduct an in-depth discussion into how your user experiences a product or situation, and so it is important to keep distractions to a minimum. Should you find that someone wishes to also take part in the interview, such their superior or another employee, it is worth asking them to arrange another session to share their ideas separately, or, if they’re just listening in, ask them to keep any questions until the end. Users often feel more comfortable, and give more expansive answers if they are not worried about being interrupted.
Ask to record: In all of these scenarios, it is very useful to record the sessions for later reference, and that you clearly explain that you are recording the interview, to get their consent before you begin doing so. I find it useful to explain how the recording is just for the purposes of reviewing, and will not be shared with anyone outside the team, just to put their minds at rest that what they are saying will be treated confidentially.
Getting the most out of your interviews
You’ve made your preparations, contacted your interviewees, and you’re ready to begin, but how do you actually ensure your interviews are successful?
Putting the user at ease
I once witnessed a famous comedian try out his jokes on an audience at a small show before embarking on a nationwide tour. He would read out each joke from a clipboard, and then gauge our reaction, to see if the joke was successful. Whilst his material was amusing, it made the overall experience feel disjointed and odd, especially when he would pause between jokes, and move from one to the next without any form of build up. When you’re interviewing someone with a list of questions, you’re in a similar situation — you could run through the list of questions sequentially, with no regard to the continuity between questions, but that could also make the interview feel more like an interrogation. Instead, turn the interrogation into a conversation between you and the user; find the way that you feel most comfortable conducting the interview (I personally prefer to focus on the conversation between myself and the user, ensuring we cover all the questions by having the printed list to one side, and leave note taking to a recording or, if that is not possible, a colleague taking notes), and try and find a structure that provides an easy way for the user to move between one subject and the next. This will, in turn, make them feel relaxed, and encourage them to think in more depth about their answers. Below is a typical process that I follow to make the interview more conversational, and put my users at ease:
A suggested interview structure
- Start by reminding the user of the context in which they use the product (or, if the product does not exist yet, the products and processes which they currently use), by asking them to introduce themselves, and describing what they do (for example, if the product is something they use in their job, ask them to speak about what they do for a living, and where the product would feature in their work). Ask them what their main responsibilities and goals are, and what gets in the way of achieving them.
- Get an idea of the end-to-end process involved in using the product; ask them to take you through each step of what they do to acheive their objective (the process which your product facilitates, or will do, when it has been made). This may well be similar to the user journey you have outlined above, and it gives you the chance to evaluate the differences, and ask questions at each step to gain extra detail. Extra points: ask them what brings them to start the process, and what they do after they complete it, for a better understanding of their motives and extra possibilities for improvement.
- If they say something which interests you and you haven’t previously considered, feel free to explore that by asking them further unscripted questions, and look for answers from the user which provides insight into problems to solve or opportunities that can be explored later. Identifying these will become a valuable skill in your user interviews, as they can provide the seeds of lifting a product from simply answering the basics of the brief, to excelling it by providing delighters. If you feel the conversation is veering into areas which aren’t useful, you can always bring it back to what you were talking about previously, or, if you can’t recall, pick a question you haven’t asked yet, and start the conversation again with that.
- It’s always useful to ask the user what problems and frustrations they currently face with their situation, and ways in which they feel the situation could be improved. Some researchers and stakeholders are averse to such a direct approach, but I feel that asking the users to consider solutions might actually provide insights that we have not previously considered. The key thing here is that it is fine to discuss possible solutions, but to not let them take over the conversation. You can focus on working out solutions later in your analysis
- You can then check through your list, ask any questions that have been missed, and ensure that you have all the information you need. This provides a natural wind-up to the session, and also encourages the user to ask any questions that they might have for you, which can further promote conversation. Always leave the conversation by thanking them for their time, and offering to be always available to answer questions, should they think of them later. They will often say the same, which is useful if you need to go back and check up on something they have said.
With this approach, I’ve found user interviews to become much more enjoyable situations, where both you and your interviewee feel satisfied and interested with the outcomes.
Involving your team
User interviews do not need to be something you conduct on your own; it can be very useful to have team members and stakeholders listening in on the conversation, provided that they do so quietly. If they wish to listen in, ask them to sit quietly, or mute themselves on the call, so that the user is only speaking to one person, but also set up a chat channel with your team, so that they can contribute questions, which you can insert into the conversation when you are ready.
Including team members and stakeholders on interviews not only means that they can take their own notes, but it also means that they get to hear the user’s responses themselves. After taking part, I have often been told by team members and stakeholders that they have discovered something which they were previously unaware of, which indicates the value of the research, and promotes interest in the user’s opinion. Fostering this empathy for users in your team will help encourage them to remember what users have previously said, and take them into consideration during production decisions.
Post-interview
When you have spent time talking with users, and have your recordings of the conversations, you will need to turn those conversations into something that your team can use to analyse, and work out how those user responses affect the project.

Summarising the interviews
Summarising your recordings can be done a number of ways, but what I find easiest is to listen back to the recordings, and jotting down the key points which are being made and discussed in the conversation, one per bullet point. Whilst this can feel somewhat laborious (I find for every hour of interview, transcribing can take double that time), it also gives you a chance to review the conversation at your own speed, and review parts that you miss the first time. In projects where users have a technical expertise, they can make references or statements during the interview that you miss at the time, and this review process helps pick up on the detail that they are imparting. Details such as this can often prove important for the project, and so it is important to ensure that you have thoroughly reviewed the conversation.
Often you will find it easier to review the interviews straight after they happen, which provides a number of benefits; you still have a fresh memory of the conversation, which reduces confusion between the responses of multiple users; you save time by using the time between interviews, meaning you have results to show to stakeholders earlier; and you gain insights earlier, which might help you identify questions which turn out to be irrelevant, or questions that you haven’t considered, and can amend your later interviews to suit.
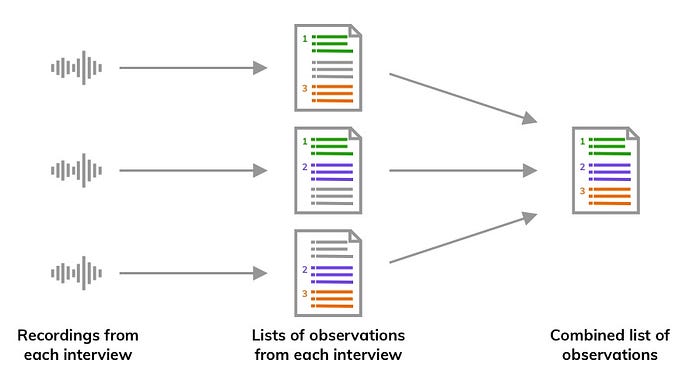
When you have a list of observations for each interview, you will need to analyse what the common themes are, to identify trends in the responses. Start a new bulleted list, and write out responses that you find occur in more than one interview, taking note of who said what by noting the initials of the person who said them, or using an assigned number. This way, you can have a list of the common shared problems, which, by prioritising in your production, can ensure that your solution helps as many people as possible. These common problems can also be grouped together to form points used in personas, as an avatar for the common problems experienced with a certain type of user.
It is useful to keep records of both the individual responses, as well as the combined ones, as they may turn out to be relevant later in the project, or in other associated projects. For projects that work with a group of users over time, it may well be useful to build up an aggregated picture of the responses that your users give. The ability to correlate and compare answers along certain themes are useful here, and this is where you may wish to look at more advanced solutions, such as Optimal Workshop’s Reframer, which allows you to store observations in a database, which can be tagged and analysed, so that common themes can be more easily extracted.
Personas
Personas are the final stage of summarising your research. Taking the collected observations, you can use them to create a persona for each different type of user, synthesising the findings together into a more digestible format for sharing with your team in analysis and production.

Personas are usually differentiated by specific qualities, such as their role, specific group or geographic location, depending on the way that the project wishes to regard the different people who use its product. They help summarise the feelings and difficulties of the people in each group, and give an idea of their needs that the product can address. They also become useful “information radiators”, reminding team members and stakeholders of the user needs, and so should be displayed in public places, either on office walls, or in shared online spaces, so that they can be frequently seen, and easily referred to.
Analysing the research findings
You have now arranged interviews, spoken with users, and collected observations around your discussions, but how do you work out how this affects your project? Analysing your discoveries, and exploring their implications is a key factor in understanding the needs of your users, factoring those needs into your project, and ensuring that you build something that they are going to find truly useful.
Discover with your team
Ideally, you will want to conduct the analysis of your findings with your team and stakeholders. By doing so, you will ensure that they also gain insights into the user’s mind, and understand their needs, but it also provides an early stage for them to provide ideas from their perspective. What’s more, it helps you with the workload, producing more useful artefacts, which will help inform each stage of the production process.
You may wish to start by presenting an overview of your findings to everyone. Share the journey you have taken so far, including the questions you have asked, and the discoveries you have made, including the personas you have derived from those discoveries. Using quotes from the research, either written or audio, to illustrate key points can be quite powerful, and help team members to empathise with what users have said. This will help set the scene, and give them a starting point on which to base their analysis.
Exploring the problem
To help put your team members in the mindset of the user, and to tie the user needs into the project work, it may be useful for them to explore the problems with a couple of exercises:
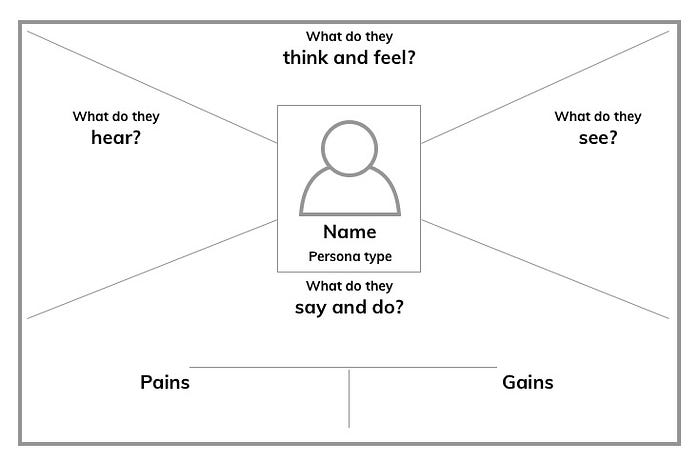
User Empathy Maps: Split the team into groups, one group per persona, and provide them with an empathy map (as shown above). Get them to discuss each of the sections of the map — how the user thinks, feels, what they say, and what influences them about the product. Get them to fill out what problems (pains) and opportunities (gains) they might have in relation to the product, or the processes and situations in which they use it. Ask them to present them to the rest of the team for discussion and feedback. Extra points: get them to define where they have filled out verifiable observations, and which are assumptions, as this can provide useful material that you may wish to validate later in testing.
User journeys: Using the knowledge of the personas, empathy maps, and the processes, get your team to repeat the user journey exercise that you performed before the research. Map out each stage of the journey a user takes to get from the start to the end of the process in using your product, or performing the task which your product will improve. Get them to add questions, ideas and comments, as before, and discuss them together. If you have more than one user journey involved, identify which one is the most important, and what are the key performance indicators you must achieve in each stage in order to ensure that you are fulfilling the needs of the project, and the users. Extra points: use those key performance indicators as testing objectives, to be measured when it comes to evaluating your product later on.
Ideation: Get the team and stakeholders to have a go at drawing screens, processes, or ideas, using simple boxes and arrows. The idea here is to focus on overall concepts, rather than details, so give them limited time in which to devise their ideas. These can help them explore solutions, which can then be presented to the rest of the team and discussed, and brought together to inform what goes into prototypes and final designs.
By the end of the analysis session, you should have plenty of artefacts which clearly show the progression of thought; from the user journey you used at the start to interrogate the brief, which in turn informed the lists of questions you asked to the users, the responses you recorded from them, through to the shared observations that came out of those sessions, the personas made from those shared observations, through to the explorations carried out in the analysis sessions around those personas, exploring the problem and definign ways in which you can produce a solution. These artefacts all become a body of work which demonstrate the through-line between the brief, the research and the solution, which should be maintained throughout production by ensuring that these artefacts can be easily seen and referred to. Photograph, scan and save them, place them on walls and shared spaces, and refer back to them frequently in the work, including them with designs, project tracking tickets and planning boards, to show how you reached those ideas. You can also use the requirements established during the research and analysis to inform the criteria for testing, so that success is measured not just on whether the solution technically functions, but whether it actually goes towards solving a key user need. Use those key user needs to inform discussions; if a new feature is added, ask what user needs it is solving, and, if one can’t be found, ask whether you should be including it? By ensuring that your solution is based around the discoveries you have made in your research, you are confirming that it addresses problems that users are actually experiencing, and therefore be something that is valuable to them, thereby making sure of the success of the product when it is launched.
Summary
As this somewhat extensive guide has shown, there is much that goes towards performing successful research and analysis on a project. However, what it has also shown is the value of all that effort. By having a process which successfully answers the questions of the brief, discovers the needs and opportunities from the user, and then has each step inform the next, providing a clear line of reasoning from research to solution, we can be sure that user needs inform the product, and therefore of its success upon launch. What’s more, by conducting research before you build something means that you ensure that production is informed by the wealth of answers gained during research, and your solution is better designed to help the user. Building a solution first, and then testing it gives you feedback on how to make that solution better, but if it doesn’t solve the needs of the user, then that solution won’t be successful.
At first, having solutions that are successful can provide a competitive advantage, especially if your competition isn’t using the same processes. After a while of having these practices embedded into your production, it becomes vital to include them, and the concept of launching a product without having researched it properly will seem foolhardy. Putting out products and hoping that they succeed will seem foolhardy when compared to putting out products and knowing that they will succeed. What’s more, by including your team and stakeholders on the journey, they will become further invested in it, until not only are the UX people championing the needs of the user, but you have product owners and developers alike requesting for features to be included, because they can clearly demonstrate that it will benefit the user.
I hope that you have found this guide useful, and would love to hear if you have used any of the tips or techniques described above in your own work, especially if they have been successful. You can find a handy checklist of all the points I’ve made above here. Best of luck!